Animation at Blue Mountains TAFE

Looking at ideas of sequential art and some of the techniques, terminology, tools and software used to create animations.

Monday, March 27, 2006

Motion Path tween

We know how to make an object move form point a to point b in Flash. The Motion tween guide allows us to create a movement that will follow a line drawn with the penicl, a paint brush or a shape usch as a circle/oval. how you ask? Using a motion guide layer. Basically it works like this:
  • Open a new flash document
  • Create a symbol (we used a fly) - call the layer object
  • Close to the new layer option you will find an option for new motion guide layer
  • Create this motion guide layer
  • Right click into say frame 30 on the object layer
  • Choose - Insert frame
  • Right click again, choose create motion tween
  • Third right click into the same spot and insert a keyframe
  • Click into frame 1 of the Motion guide layer
  • Using the paint brush to draw a squiggly line from the object along the path you would like to move
  • Change the tool to the move tool
  • Make sure it is on the Snap to option
  • Click into the keyframe at the end of the Object layer
  • Drag the object to the end of your line, note the black circle in the the centre as it goes over the need of the line, it should snap on
  • Press enter - does it work - congratulations BB!!!
Monday, March 13, 2006

Another Successful Night


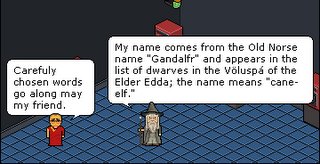
Tonight we sucessfully created cartoons in Gnomez and published them to our blogs by screen dumping them and cropping in Photoshop. We used Photoshop's Save for web feature to optimise them for the blogs.
Ward sucessfully edited the cartoon in Photoshop and update his blog with the new version.
we looked at the Judy Horacek website as an example of cartooning and scripting, the used her fabulous "Silence of the Jams" cartoon for an exercise in flash. Usign trace bitmap the task was to do a 30 sec animation based on the cartoon. From one begining we had many endings!
Homework was to explore motion paths in Flash, there is a great lesson under Help/Lessons/Tweening.
Congratulations to Luke for a great job of digitising drawings, editing them in photoshop and getting around the network. Oh to be able to draw like Luke!

The Dalai Lama meets Gandalf

The Dalai Lama meets Gandalf
A short story - a remarkable cartoon.

What is in a Script?

Does your animation need a script? have you ever written a script? ScriptWritingSecrets might be just the help you need to get started.
It is really all about telling a story, whether the story be an epic "War and Peace", or a pictoral "Breakfast with Spot"
dog's breeakfast
check out Judy Horacek website for some ideas on how to tell a story with very few words.
Judy Horacekis an Australian cartoonist and writer. She has been drawing cartoons for about twelve years now and has worked for a multitude of community groups, unions, small magazines and good causes. Her work is often concerned with feminism, the environment and social justice issues.

More free animation

Last week we looked at DFilm, a great free animation program online.
Stick figure animationThis week we are going to have a look at another great animation program that is used in some schools to help teach animation concept and have fun!!!
The program is called Pivot Stickfigure Animator , you can always find it by going to google and typing in "stick figure animation" or similar.

Monday, March 06, 2006

Rollovers in flash


Tonight we explore the world of button in flash. We will be creating "buttons" and givng them rollover effects.


To do this open flash:

  1. Set the document size to 250 by 250 so it will fit on the blog
  2. Create and object, say a red circle with the oval tool
  3. Double click with the move tool to select your object
  4. Press F8 to convert to a symbol
  5. Choose the button option and name it appropriately
  6. Double click your new symbol
    This takes you inside the symbol.
  7. Right click into the hit frame to define your hot spot and add a keyframe
  8. Add another keyframe into the over frame.
  9. Add text or objects you want to appear when the mouse moves over the hotspot.
  10. To display more when the mouse button is held down, right click into the Down frame, add a keyframe and make the desired changes
  11. Your button is complete, click back to Scene 1 and test your movie.
    Placing an animation with rollover effects into your blog.
  12. Save the file and go to File and Publish setting to explore choices
  13. To blog it got choose the html and swf options and Publish.
  14. This places the files in your folder where the files was last saved.
  15. We are using http://www.openomy.com/ bmphotoshop with the usual password to store the swf file
  16. Login into openomy and upload your swf file, as you would attach an email
  17. Tag it ani so it stays with the animation files
  18. When it is uploaded make sure you make it public or it will not appear without a password
  19. Copy the address/path to put into the code so your blog can call it
  20. Exit openomy and go to your folder and open the html file, got to View Source to see the html.
  21. You need the bit between object and object
  22. You will see the file name appear twice in the code, once at value="" and then at src="" - this is where you will paste the address/path from openomy.
  23. Next copy the object to object, log into your blog and start a new posting.
  24. Paste the code into your new post in Edit html mode
  25. Congratulations, Publish post and your done!!!